

What it is, folks!
Before I begin, I know, what you’re going to say, and I have taken a bit of a break from my blog. But as the sea calls out to a captain, my blog called out to me and here I am. Plus, I’m shelling out dough to keep my blog site activate so there’s that [insert eye-roll emoji].
Today I want to talk about a request I often receive when working with Public Sector clients. As functional users of Planning or Hyperion, we want to get the most out of the product that brings successes to the business, the end-users, our departments, etc. One of those easy wins is to add a comment column to a web form that allows users to easily add text to help explain variances, what they really think about the new Budget Director, you know the important stuff. Taking this one step further, people love pretty colors, so we can add a validation rule to that column so that the comment cell turns red when a comment is required. Now, if you think this is old news and you want to get a little more technical, I implore you to check out Kyle Goodfriend’s Adventure in Groovy series and see all the cool technical things you can do with data forms using Groovy.
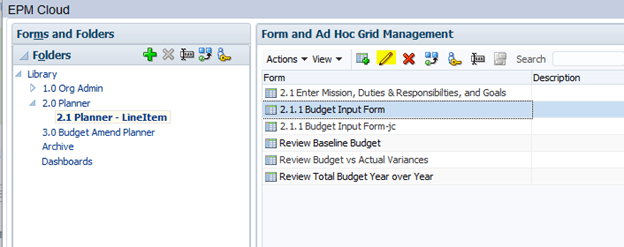
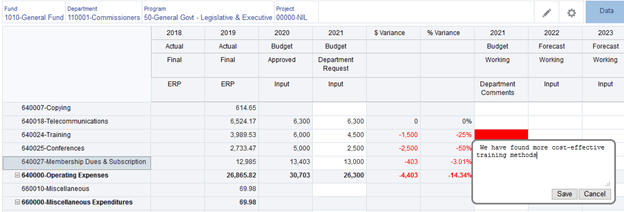
What we have below is a simple budget input form with a column for department comments. The requirements are if the variance between last year’s approved budget and this year’s department request is zero, no comment is needed. However, if the variance is greater or less than zero, then the Budget office would like to have a comment as to why the variance is not zero.

To alert the user that a comment is needed, the Budget office wants the comment cell to turn red if a comment is required. How we would do this is to add a validation rule to the comment column.
Quick Explanation of Validation Rules
For those of you new to Planning, validation rules in data forms are checked when certain conditions are met. Administrators can even include validation messages if a user enters data that violates the validation rule. And if you are using the Approvals
workflow, administrators can build limits on submitted planning unit data and designate a reviewer, owner, or notifier to review data that meets some added condition. Pretty slick!
Step 1: Create the validation rules
In our example, the first step is to create a validation rule that highlights the cell red if the variance is greater or less than zero.
1. In Planning, click on the Navigator and select Forms under Create and Manage. Navigate to the form and click the Edit icon.
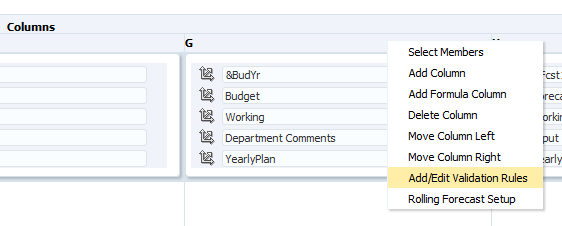
2. In the Layout tab, right-click the column heading for which you want to add or update the validation rule.
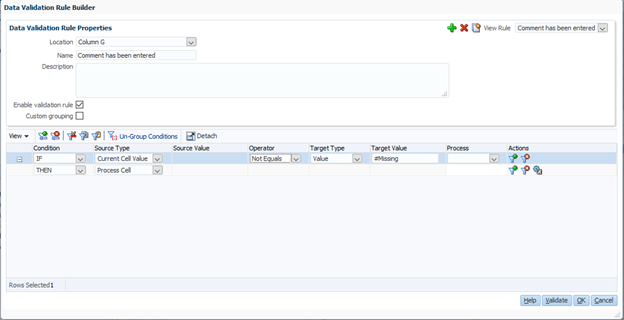
3. In the Data Validation Rule Builder, I am going to give the rule a name, and add the following conditions:
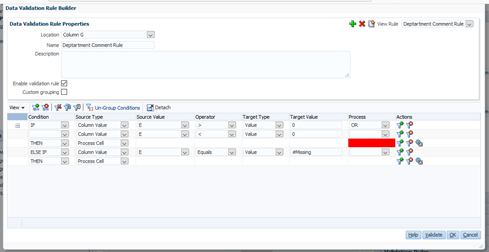
- The most important thing to realize about the rule is that is must contain and If/Then condition. I can also use Else and Else If if I have more than one requirement.
- Since I want the comment column to change to red based on the data in my $ Variance column, I pick Column Value for the Source Type and the Source Value would be equal to that particular column which I choose by clicking the Rule Selection icon.
- The next step is to select the appropriate operator for the evaluation. Since I want the cells in the column to turn red if the variance is less than or greater than zero, I choose < and >.
- My Target Type for the rule is set to Value, and the Target Value is zero.
- I continue to build the rule by adding additional conditions by clicking the Add Condition icon.
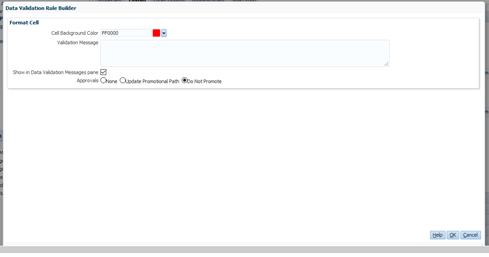
- When it is time to add the Process Cell Source Type, I click the Process Cell icon in the rightmost column to add processing instructions, which would be the cell color, any message, and Approvals flow.
7. When finished, be sure to validate the rule.
What you should see is a form with red cells in the comment column if the variance is less than or greater than zero!

Now, the last step is to add another validation rule to changes the red comment cell to white if a comment has been entered:
The cell should turn white after saving:
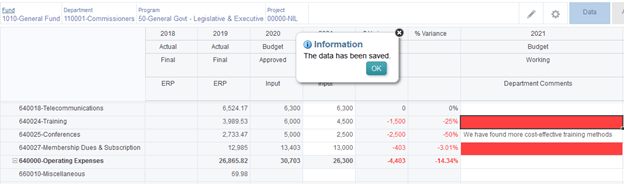
So there you have it, a simple but effective way to use validation rules to highlight cells to alert users and then remove the color once the requirement has been satisfied. A few things to keep in mind:
1. This does not, in any way, prohibit users from saving the form. If the cells are red, the form will still save;
2. The order of evaluation is important. The priority for rule evaluation depends on condition priority, location of the rule, and position of the rule in the rule list. So if you find that your cell is not turning white after a comment has been entered, try moving the rule up into rule list or make sure that the rule has a validation message, color, and Do Not Promote is selected.
Till next time!
